Zapier
Introduction to Zapier Integration
What is Zapier?
Zapier is a powerful automation tool that allows you to connect polling.com with thousands of other apps, enabling seamless workflows and data transfers between platforms. By creating "Zaps", you can automate repetitive tasks, streamline processes, and integrate various services to enhance your survey capabilities on Polling.com.
What can I do with Zapier and Polling?
Using Zapier you can both send survey completions and data to other applications as well as send user data to Polling from other applications.
Plans with Access to Zapier Integration
The Zapier integration is available to users on the Essentials Plan and above.
Getting Started with Zapier
Step-by-Step Guide to Setting Up Zapier
- Sign Up for Zapier: If you don't already have a Zapier account, sign up at https://zapier.com/sign-up.
- Connect Your Polling.com Account:
- Log in to your polling.com account.
- Navigate to the Integrations section in your dashboard.
- Find and select Zapier.
- Follow the prompts to authorize Zapier access to your polling.com account.
- Create Your First Zap:
- Go to your Zapier dashboard and click the "+ Create" button.
- Select polling.com as your trigger app and choose an event (e.g., "Survey Completed").
- Set up the trigger details according to your preferences.
- Configure Your Action:
- Choose another app to receive the data or action (e.g., Google Sheets, Slack, etc.).
- Set up the action steps and mapping of data fields.
- Test and Activate Your Zap:
- Test the Zap by clicking the "Test trigger" button to ensure it works correctly.
- Once confirmed, activate the Zap to start automating your workflows!
Restricting Survey Complete Zaps to Specific Surveys
Limiting Zapier Triggers to Specific Surveys
By default Polling.com will send all survey responses to Zapier. To limit Zapier to only listen responses from specific surveys:
-
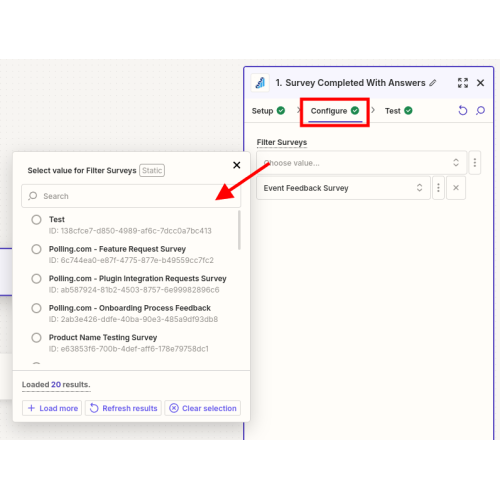
Navigate to your Zap: On Zapier, go to the Zap that you want to limit the surveys, and click on the Trigger box.
-
Go to the Configure Tab: On the now opened Trigger menu, go to the Configure step.
-
Select your surveys: On the configure tab, click on the "Filter Surveys" field, and search for the survey that you want to limit Zapier to listen to.

Once set, Zapier will only trigger and send data for the designated survey(s), giving you more control over which data gets processed.
✏️If you don't see your survey listed in the dropdown, make sure to load all entries using the "Load More" button at the bottom left of the dropdown.
The Survey Session Data Format
How Survey Sessions Are Sent to Zapier
When a new survey response is submitted on polling.com, Zapier triggers an event (Survey Completed) that sends the survey data in a structured format. This data includes several key fields that allow you to capture all relevant details about the survey response:
Survey UUID(string): The unique identifier for the survey (e.g.,1ecf9a3e-6c69-4c63-b254-0f32a88e7f61). This can be found by navigating to your surveys page and clicking the dropdown arrow on the "Edit" button of a survey. It is found at the bottom of this menu.Survey Name(string): The name of the survey as specified during creation (e.g.,My Sample Survey).User Session ID(string): A unique identifier for the user session during which the survey was taken (e.g.,1001).User External ID(string): A unique identifier for the user, which could be either your provided customer ID or an auto-generated one if not provided (e.g.,890a12ab88a37414e6cef31f7dc8476e).
Answer Data Structure
The Answers field is an array that contains details for each question answered in the survey, it's only present on the "Survey Completed With Answers":
question_id(string): Unique internal identifier for each question (e.g.,1000).question_hash(string): A unique hash for each question within the survey (e.g.,XE6qkCBiuT).question_type(string): The type of question, such astext,checkbox,radio, etc.question_title(string): The text of the question (e.g.,What is your name?).answer(string | array of strings): The user's answer(s). For single-response questions (e.g.,radioortext), this will be a string (e.g.,John Doefor a text response,Yesfor a radio response). For multiple-response questions (e.g.,checkbox), this will be an array of strings (e.g.,["Red", "Blue"]for a checkbox question).
Important Note on Data Structure
In Zapier, the Answers field is "flattened", meaning all responses are combined into a single, comma-separated field. This format might result in a lengthy, concatenated string of responses when directly integrated with certain applications, such as when adding a row to a Google Sheet. It’s essential to consider this when planning how to process or utilize the data within Zapier or any connected apps.
Please reference our included Zapier templates for assistance with parsing this data for various use cases.
Additional Fields
Other fields included based on your survey settings:
Started At(string): Timestamp indicating when the user started the survey (e.g.,2024-01-01T14:52:02Z).Completed At(string): Timestamp indicating when the user completed the survey (e.g.,2024-01-01T14:52:45Z).
Reward Information
If a reward is configured, the response will include a reward object:
Reward Name(string): The name of the reward (e.g.,Coins).Reward Amount(integer): The amount or value of the reward (e.g.,100).
Custom Data
If custom JSON data is provided in the survey settings, it will be included as Complete Extra JSON:
Complete Extra JSON(string object): Any custom JSON provided in the survey settings will be returned in its entirety. This JSON is returned as a string and should be parsed on your side to utilize the data correctly (e.g.,{"prop": "Completion extra json from survey settings"}).
By understanding the structure of the data sent via Zapier, you can more effectively plan your integrations and automate your workflows to enhance your survey strategy on polling.com.
Sending Events from Zapier to Polling.com
How to Set Up Zapier Triggers to Send Data to Polling.com
Polling.com can also receive events from other apps via Zapier, allowing you to enrich your audience data and improve segmentation. Here’s how you can set this up:
-
Choose a Zapier App and Trigger Event: Start by selecting an app in Zapier that will send data to polling.com (e.g., Hubspot, Mailchimp, etc.).
-
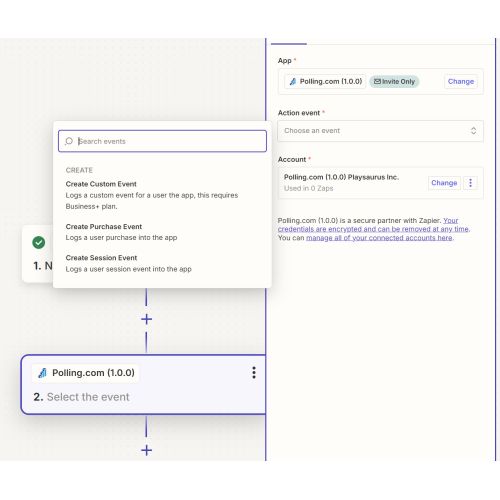
Select Polling.com as the Action App:
- Choose Create (X) Event as the action.

- Choose Create (X) Event as the action.
-
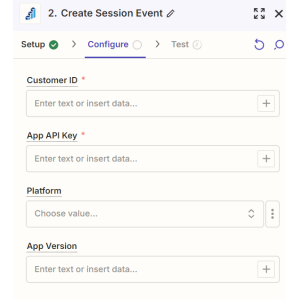
Map Data Fields:
- Next in the "Configure" step you will need to provide your App API Key and a Customer Id. (Note: customer id is referred to as "external_id" on app listings)
- Mapping these data fields ensures that the incoming data is properly formatted and can be used for audience segmentation.

-
Test and Finalize:
- Test the Zap to ensure the event is correctly sent and received.
- Finalize the Zap and set it live to start sending data to polling.com.
✏️Purchase and Session events are available to the Essentials Plan and above. Custom events are limited to the Business Plan and above.
By using this feature, you can seamlessly integrate data from various sources, enabling more precise audience targeting and more advanced survey result segmentation for your surveys.
Choosing Between Zapier and Webhooks
When to Use Zapier vs. Webhooks
Zapier is ideal when you need to automate workflows between polling.com and other apps without writing code. It’s user-friendly and offers a wide range of integrations that can handle data transfer, notifications, and more with just a few clicks.
Survey Webhooks, on the other hand, are more suitable when you have specific server-side logic to handle survey responses. Webhooks provide a more direct and customizable way to receive data immediately after an event occurs. Additionally webhooks cost nothing, if you plan to process many thousands of events or survey responses Zapier can become cost prohibitive.
Key Considerations:
- Use Zapier if you prefer a no-code solution, need to integrate multiple third-party apps, or require easy automation of repetitive tasks.
- Use Webhooks if you need more control over the data flow, have specific backend processes, need immediate data delivery, or have significant data processing needs.
By understanding the strengths of each option, you can choose the best method for your specific needs and maximize the efficiency of your data workflows.
Customers on the Enterprise Plan or Business Plan who need assistance with Zapier or Webhooks should contact their assigned account representative.